
Technically the previous post was our first one, but this is our first informative post – read: even more exciting!
The topic we’ll broach is Designing your Dream Bathroom. We’ll break it down for you! Step 1 is : Planning the Space, or designing the layout.
Lucky for me, I recently had the opportunity to design my own luxury, master bathroom, and I’ll share my journey with you by discussing each phase of the interior design process from planning all the way through to the reveal.
The foundation of interior design is the layout – and if your layout is logical, cohesive, has good flow, and addresses your particular needs & wants, then the rest will follow.
In our case, we were beginning with a bathroom layout that was not well designed for our purposes.
The existing master bathroom had a strange layout. As you walk in you were faced with a tiny, pedestal sink, to the right of which was a toilet, facing the toilet was an enclosed, read: dark and claustrophobic, shower. There was absolutely no storage to be found.
Here is the “before” photo of the bathroom:

Bathroom “Before” renovation
You may be thinking, How do I come up with a layout that works for me?
First, determine your must-haves and priorities for the space.
My luxurious master bathroom must-haves as they pertain to functionality and usage were as follows:
- Double sinks
- Makeup application area
- Freestanding bath tub
- Larger shower
- Ample storage
Planning is much easier when your information is clear and easily accessible! So once you have your list, you can see how to go about fitting the pieces into the allotted space, or current footprint of the room.
Move things around (to scale of course) on paper or on your computer, play with the space until you find the most logical way to incorporate the elements, given any constraints that may exist.
I’m not going to lie, vision is paramount in doing this. In fact, it is invaluable – and, as such, you may decide to hire an interior designer to help devise your space plan.
Here was the floor plan of my bathroom pre renovations:

Original layout of master bathroom
In order to come up with a new space plan, as explained above, I studied the existing layout and tried to plot my must-haves in the given space.
It quickly became clear that I’d be able to move a few things around, but no matter what there was no possibility of incorporating the freestanding bathtub, larger shower, ample storage, or makeup application area, into the footprint of the existing space.
I could get in the double sinks along with some storage, but that is the extent of what would fit.
Since my must-haves were non-negotiable I’m lucky to have come up with a handy solution that would allow me to fit in everything I wanted.
I discovered that I could enlarge the footprint of the bathroom without sacrificing living space. I could do so by stealing space from the hallway and a sliver from the adjacent room. The hallway leading to the bathroom, and the adjacent areas, was considerably wide, and there was really no reason for this – it’s extra width served no purpose.
Therefore, it made perfect sense to make use of this extra space in the hallway by giving it to the bathroom, thereby creating a large enough bathroom to accommodate all of my must-haves.
In doing so, I was able to create a new bathroom layout that is efficient, and includes all of my must-haves; plenty of storage, double sinks, a makeup application area, a freestanding bathtub, larger shower, and then some.
See the new layout below.

New layout for master bathroom
What is so great about this new layout is that I get a larger bathroom, but it doesn’t feel like I sacrificed anything, and that is a trick to efficient interior design and space planning: creating more space within the same square footage.
In fact, I was even able to squeeze in a larger closet in the adjoining master bedroom, and the hallway still feels airy. So it is a win-win situation!
Have a look at the before and after bathroom layouts side by side.
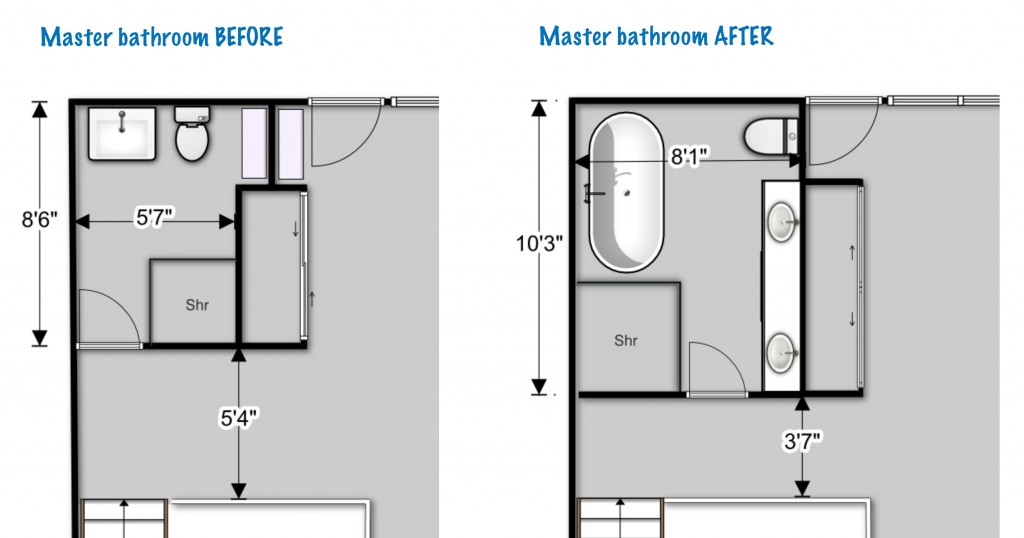
Before & After layouts
Stay tuned for the next post!
– Keren